REAL-TIME PROCTORING
Online proctoring powered by Examus
1. Basic terms
The task of the real-time proctoring is to control and support online exams.
The essence of real-time proctoring is that the Proctor detects violations on the part of the subject in real time and these violations are visible to the exam taker. If the student continues to break the rules even after the Proctor’s warning, the Proctor assigns the session a negative status BEFORE the test is completed.
There are standard ways of cheating on the part of the exam taker during the online exam, such as:
- Assistance from outsiders behind the scenes.
- Cheat sheets on the table or wall.
- Phone or second display.
2. Interface of the proctor’s account
We will analyze in detail the interface of the proctor’s room, the features of communication with the student, and the monitoring process.
The first step you need to do is log in to the proctor interface, which is simply called “room”. This interface is available via the link https://eu1.examus.com/. From the calendar, you can also get to the Proctor room by clicking on the “Exams” button.
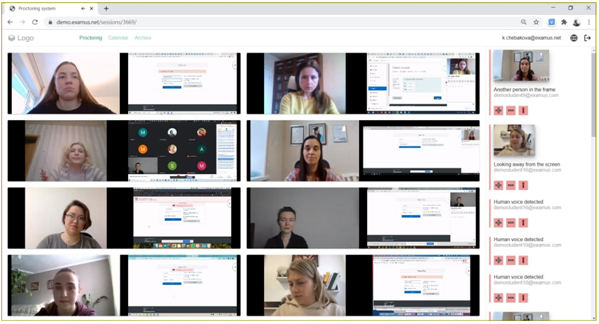
Let’s enter the proctor’s account and there you will see the proctor’s interface. Let’s look into it. You can see it further.

Here you can see:
1. Windows with students. It is Important to understand that the real-time Proctor monitors the exam of several students at the same time. The maximum number of students for one proctor is 8. Your task is to be able to monitor video from cameras and desktops from all students simultaneously. Based on statistics, there are only one or two violators out of eight.

2. On the right, there is a field with violation marks from cyberproctor. Messages are displayed here for all the participants. This will help you not to miss the important violations. Messages from cyberproctor can be confirmed (+), deleted (-), or sent as a message to the student (!).

3. When placing the cursor on a window with a student we see all his or her data and the most important the rules applicable for his or her exam, what is allowed and what is not.

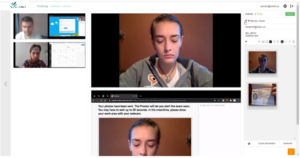
A special feature of the proctor’s interface is that you can simultaneously see two windows for the student’s videos from the camera and desktop:

You can see the fast access window. All the information of the selected student is shown there. You can expand to the main screen the big image of the student and also his or her or her individual session number and his or her or her personal data by clicking at the picture of the student If you hover your mouse over a specific window of a student, you can hear all the sounds from their microphone of the exam taker.
4. Another important feature is that when you maximize the view of one student, all the other students are still visible on the left, which reduces the risk of missing some violations.

5. At the very top, you can see more detailed information about the exam taker, the subject of their exam, the name of the University that provided the test, and additional rules, if any.

There are two buttons next to it: green to allow the test taker to start the test, and red to end it. In addition, we can see a cross next to the session number, which we can use to end the student’s session before the test starts, if identification is not possible. In case if there is no identification document, or if the full name in the document and in the system does not match.
6. Please, look below. There is a document field. Its main feature is the “re-request” button. It is shown as a reverse arrow.
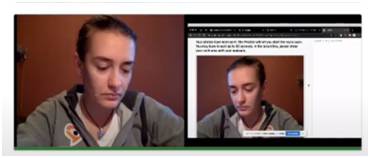
Also you can request student to retake photo from the main view:

7. Below that is a chat between the examinee and the Proctor

8. Under the message input block, there is a button that allows you to send several quick messages.We will learn its usage further.

- And, perhaps, the most important element of the proctoring process is the block for adding alerts and the “warning” button. The following alert options are available:
- Another person in the frame
- The student has been replaced
- The absence of student looking away from the screen
- Active window has been changed
- Human voice in the audio stream
- Forbidden sites or software
- Forbidden hardware
- Books/notes are used
- Cheater
We will discuss the specifics of using alerts later. The alert Cheater is important, we will talk about it further.
For now, we learned about real-time proctoring and the interface of the Proctor’s room in the SprintTesT system.
3.The sequence of the work of the real-time proctor
In order to start the interaction among the proctor and the students and their videos which consist of several windows, you should select the needed student and his or her window will start to be active.
1. The first thing to do at the beginning of the exam is to identify the exam taker:
In the upper-right corner of the page there is a document icon, click on it to enlarge the image and compare the full name in the document with the declared full name. An important detail is the “request another photo” button. You can use this button to ask the examinee to take another photo of the document if the image quality is poor. Without a photo of a proper quality, the student is not allowed to take the exam.

The following documents are suitable for identification: passport, driver’s license, student ID card or any other document specified by the exam organizer. If you cannot identify the student, then you can use the cross next to the session number, which allows you to disable the examinee before the beginning of the test.
2. The second and the most important step is to check the examinee’s workplace.It’s one of the most important duties of the proctor because the table and the area around the student is empty, it is less possible the use of cheat sheets and any other prohibited tools. And the more carefully the Proctor checks the student’s workplace before the exam, the easier it will be for him to observe the student during the exam.
3.Communication with the student takes place in a chat.
We can ask the examinee to show their workspace area using the quick message “workspace” available at the bottom of the chat, or using the quick message “request to show workspace” from the main page’s event feed.
If the workplace looks suspicious, you should ask the student to clean it and remove all unnecessary items.
It is necessary to remove all papers from the table if the examinee is not allowed to take notes. It is also necessary to put the phone as far away from the student as possible – the Proctor should be able to see where the examinee put it and ask the student to stay in the room alone, if possible. (this does not apply to classes or the examiner’s workplace, where there are always some strangers)
If the student cannot be alone, ask their neighbor to position themselves in the camera’s focus of view away from the student so that the Proctor can see where they are.
Allso, the student should show by the camera the room in which the/she is located
and the wall in front of him, because there could be cheat sheets or a second
monitor.
If the examinee is sitting with a laptop in front of another monitor, this monitor must be rotated 90 degrees or moved to a different location so that the examinee cannot use it.
If a student uses a monoblock with a built-in camera, ask them to show the workplace with their phone: take a photo and show it to the camera, then if the table is clean, ask them to put the phone away so you can see where it is placed.
4. As you have identified the student and got sure that nothing interferes with the fair conduct of the exam, you can allow the student to take the exam.
To do this, use the green “start” button.

5. After that, the student starts the exam, and you must proceed to identify the next student. In total, it should take about 15 minutes to check the workplaces of all exam takers.
So, how do you monitor students when there are several of them? Let us go deeper into the specifics of this process.
4. The rules of the Exam
You can see the rules and the additional rules of the exam. The additional rules would appear only if they are set for the test. The forbidden actions are indicated by grey color.

Voices. Usually, this feature is allowed if the exam taker is in a classroom or library.
Using books – the student can use a paper or electronic summary (for example, in PDF format). used under the website icon.
IMPORTANT: the summary located on the website must be used under the website icon.
Using Excel- the Excel program without additional entries in it (unless additional rules specify different meanings).
Using paper- in other words, the user can take a blank sheet of paper with no entries on it (unless additional rules specify different meanings).
Using websites- the student can use Google and any sites, unless (unless additional rules specify a different list of websites).
Absence in frame-In other words, the absence of a test subject is not a violation (unless additional rules specify different meanings).
IMPORTANT: additional rules are more important than icons. If they exist, you need to focus primarily on them.
Using calculator- in other words, the user can use a physical or a software calculator.
Using messengers- for group tasks and simulations
Wrong gaze direction- if the student is not allowed to use the draft, this icon means that they can look away from the screen.
Human assistant- This rule is used for group tasks that involve multiple people.
IMPORTANT Additional rules are more important than the icons. In case there are additional rules you should consider them as the first source.
5. The marks of the violations
The most important is that you know how to mark the violations. The list of alerts:

The most important thing you need to know is how to record violations. Let us now take a closer look at the list of the warnings.
● Second person in frame.
This warning should be sent if another person who helps the user to pass the exam is seen in the frame. It shall not be marked if some random people appear in the frame: a cleaning lady, colleagues at the workplace, an administrator, or a technical specialist.
● The student replaced:
This alert shall be marked if the test taker leaves his or her place during the test so that another person can pass the test for him.
● The student is absent:
We send this alert if the student leaves camera view during the test.
It shall not be marked if the test taker left his or her place before or after the test, or if according to the rules he/she can leave the room between sections of the test.
● Wrong gaze direction:
This is a complex alert, so let us look at it in more detail.
Even in the case when using paper is allowed, it shall be marked if the student looks away for more than 5 seconds and reads something or if the student quickly glances to the side before each answer.
This warning should not be sent if the student can make some notes, as well as when performing tasks that require mathematical calculations or using the keyboard to write an answer or essay.
● Active window changed. We mark this violation if a student opens some forbidden software – excel, calculator, messengers and so on.
● There is another similar alert forbidden sites or software. It is usually marked if the student opens Google or some other websites prohibited by the rules. According to the situation you can choose between these two alerts the appropriate one – there are no strict rules as to whether you should use a specific warning.
● Let’s move on – human voice in the audio stream.
We mark it in the following cases:
if the student speaks ALL the questions and answers out loud, even if can’t hear voice of another person.
if the student discusses questions from the test and their solution with somebody else.
if the student is silent, but an outsider tells the student the answers to the test questions.
Or if we can hear some other suspicious sounds.
● Forbidden hardware:
It should be sent if the student uses headphones, smartphone, tablet or any other forbidden devices.
● Using books and notes:
It is marked if you can see or hear page flipping, with regular glances.
Remember – when we send a warning to a student, we create a mark on the video so that we can view these exact time points on the video later in the archive.
And you can always ask the student to show their workspace again, even during
the test if you think the students ‘ behavior is suspicious.
● The last warning – “cheater” is applied as follows:
to assign a student the status of a cheater, we must send him three identical warnings with a difference of 2-3 minutes. After that we do not need to continue to monitor this student, but focus on other examinees, however, the Proctor must answer the questions of the cheater until the end of the test.
Another important point: in any case, the test will be completed, but the status of its verification may be different.
6. Finishing the exam
The exam process ends as follows: the examinee completes the exam by theiself but remains in the system for a few minutes after that. The Proctor continues to be in the room until all exam takers are disconnected.
In case a student wants to finish the exam by themselves, the proctor can show to the student how to do it, according to the rules of the educational institution.
There are some cases when the proctor must disable the exam taker from the test. It could be done after the warning in case:
● there is no videostream and the standard recommendations didn’t help or the exam taker denied to fulfill them.
● the exam taker fixate all the questions in the test (for example in a Word document, to pass them to other exam takers)
In case the exam cannot be continued due to technical issues the testing can be finished by the proctor with the button “finish the exam”.
7. Pay attention!
You should pay attention to the student’s work process. Let us look at a few examples. We see a student writing something while looking away from the screen. According to the rules, he or she can use a draft, and on his or her desktop screen we can see a question or task that requires calculations. This means that, most likely, nothing forbidden is happening at that moment. But if we see a second person in the frame, we should pay more attention to the video with this student to check that these outsiders aren’t helping him.
In real-time proctoring there are less cheaters than in the post-review proctoring. And this is directly related to the Proctor’s attempts to discourage the student from performing prohibited actions. To do this, as we said in the last video, during the exam, you can use the chat to ask to remove unnecessary items if you notice them, ask strangers to leave, show the table again, and other messages that will help prevent violations. Many students stop trying to cheat after the first alert.
If a student’s webcam or desktop video disappears, the proctor must at first reload his or her own web page. If the video does not appear after that, ask the student to stop sharing the screen and allow access to his or her screen again. A quick “missing video” message is available for this purpose.
After that, you must make sure that the student received the message and completed the necessary actions, because if the video does not appear even after that, the Proctor should interrupt the exam by writing to student the technical support address and the phrase “Unfortunately, we can’t take the exam without the video and have to interrupt the exam”.
Students often see communication with the Proctor as the first line of support when they encounter some inaccuracies, problems, or difficulties. But you must remember that communication between the Proctor and the examinee is strictly limited to the subject of the examination process and in no case should it concern the content of the exam itself. If there are any technical difficulties, the Proctor should recommend the student to contact the technical support service. You can do this using the quick message “Email support”.
The sequence of actions looks like this:
1. Identification of the participant
2. Checking student’s workplace
3. Allow the student to start the test
4. The process of monitoring the exam and, if necessary, sending warnings about violations
5.The end of the exam.
